


Hi,everyone! My great inspiration of summer are juicy berries! Such great colors-red and pink-beautiful and bright! And my card with splash of these colors! Mmmmm!
Привет всем! Мое самое большое вдохновение летом-сочные ягоды! Такие великолепные цвета-красный и розовый-яркие и чудесные!И моя открытка с ягодным взрывом этих цветов!Ммммм!


If you are interested,I have a step-by-step tutorial of my card/ Если вам интересно,мой пошаговый мк для вас
You need white cardstock,mists in blue and red colors(I use Tattered Angels), White High Impact paint TA or other white acrylic paint,texture paste, clear plastic sheet, cheap board (I use Dusty Attic item) and some embellishments-berries and sequins. And also your favorite stencil and scissors,of course!
Вам понадобится беля акварельная бумага,спреи голубых и красных оттенков( я использовала Tattered Angels ,White High Impact paint ТА или белая акриловая краска ,текстурная паста,кусочек прозрачного пластика ,чипборд ( у меня Dusty Attic) и немного украшений-ягоды и пайетки. И ваш любимый трафарет и ножницы,конечно!
1. Wet white cardstock with water and add light mint color with brush .I use Mint Julep TA. Let it dry
Увлажняем бумагу водой и добавляем светло-мятный цвет кисточкой. У меня Mint Julep ТА ю Сушим
 2. Apply white texture paste through the stencil in different pathes of card. Take off and let it dry
Наносим текстурную пасту через трафарет на разных участках открытки. Снимаем и сушим!


 3. Cut from cardstock some triangles and place it on the card as in picture.Don't glue!
Вырезаем из бумаги удлиненные треугольнички и размещаем на открытке как показано на фотою Не клеим!

4.Sprincle on card two-three blue or green tones mists from lighter to darker.I use Sea Glass and Aquamarine ТА
Брызгаем на открытку двумя-тремя оттенками синего или зеленого-от светлого к темномую Я использовала Sea Glass и Aquamarine ТА
 5.Take off triangles and let it dry
Снимаем треугольники и даем высохнуть
 6.Adhesive some triangles to the card and cut them
Приклеиваем несколько треугольников к открытке и отрезаем лишнее

 7.Make a splash-sprinkle red-tones mists and white paint around the center with brush.I use Bubble Gum and Lobster TA mists and White High Impact paint
Делаем ягодный взрыв -брызгаем спреи красно-розовых цветов и белой краски вокруг центра с помощью кисточки .У меня Bubble Gum и Lobster TA mists и White High Impact paint

Sorry,it was evening!/ Простите,был уже вечер!
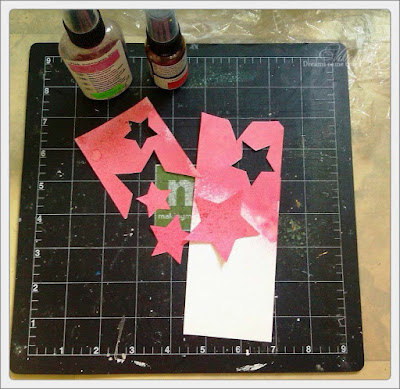
8.Sprinkle red tones mists on the piece of cardstock,let it dry and cut some stars from it
Брызгаем спреи красных тонов на кусок белой бумаги. Сушим и вырезаем звезды разного размера
 9. Write great words on clear plastic sheet with black Copic Let it dry!
Пишем на кусочке прозрачного пластика пожелание ( я использовала черный Копик) и дать хорошо просохнуть!
 10.Finally, paint cheap board (I use a beautiful Dusty Attic!) in white color and make our bright card-adhesive all details and embellishments .Add more white and red sprinkles for great result!
И,наконец, красим чипборд в белый цвет (у меня чипик Dusty Attic) и собираем нашу открытку-
клеим все детали и украшения. Добавляем белых и красно-розовых ягодных брызг!

 Thanks for your attention!!
Join June Challnge Dusty Attic's Blog


Привет всем! Мое самое большое вдохновение летом-сочные ягоды! Такие великолепные цвета-красный и розовый-яркие и чудесные!И моя открытка с ягодным взрывом этих цветов!Ммммм!


If you are interested,I have a step-by-step tutorial of my card/ Если вам интересно,мой пошаговый мк для вас
You need white cardstock,mists in blue and red colors(I use Tattered Angels), White High Impact paint TA or other white acrylic paint,texture paste, clear plastic sheet, cheap board (I use Dusty Attic item) and some embellishments-berries and sequins. And also your favorite stencil and scissors,of course!
Вам понадобится беля акварельная бумага,спреи голубых и красных оттенков( я использовала Tattered Angels ,White High Impact paint ТА или белая акриловая краска ,текстурная паста,кусочек прозрачного пластика ,чипборд ( у меня Dusty Attic) и немного украшений-ягоды и пайетки. И ваш любимый трафарет и ножницы,конечно!
1. Wet white cardstock with water and add light mint color with brush .I use Mint Julep TA. Let it dry
Увлажняем бумагу водой и добавляем светло-мятный цвет кисточкой. У меня Mint Julep ТА ю Сушим

Наносим текстурную пасту через трафарет на разных участках открытки. Снимаем и сушим!


Вырезаем из бумаги удлиненные треугольнички и размещаем на открытке как показано на фотою Не клеим!

4.Sprincle on card two-three blue or green tones mists from lighter to darker.I use Sea Glass and Aquamarine ТА
Брызгаем на открытку двумя-тремя оттенками синего или зеленого-от светлого к темномую Я использовала Sea Glass и Aquamarine ТА

Снимаем треугольники и даем высохнуть

Приклеиваем несколько треугольников к открытке и отрезаем лишнее


Делаем ягодный взрыв -брызгаем спреи красно-розовых цветов и белой краски вокруг центра с помощью кисточки .У меня Bubble Gum и Lobster TA mists и White High Impact paint

Sorry,it was evening!/ Простите,был уже вечер!
8.Sprinkle red tones mists on the piece of cardstock,let it dry and cut some stars from it
Брызгаем спреи красных тонов на кусок белой бумаги. Сушим и вырезаем звезды разного размера

Пишем на кусочке прозрачного пластика пожелание ( я использовала черный Копик) и дать хорошо просохнуть!

И,наконец, красим чипборд в белый цвет (у меня чипик Dusty Attic) и собираем нашу открытку-
клеим все детали и украшения. Добавляем белых и красно-розовых ягодных брызг!


Join June Challnge Dusty Attic's Blog


Какая вкусная открыточка! Классная идея! Спасибо за МК!
ОтветитьУдалитьО! Спасибо! Прям по свежим следам!))
УдалитьLovely tutorial! And the effect with the berries is STUNNING! Absolutely adore the creative way you have used our Dusty Attic chip board! Fabulous project - thanks so much for sharing with us this month :):)
ОтветитьУдалитьThank you,Lizzy! You make my heart sing!! Thanks again!
УдалитьОй, как необычно....ярко, позитивно!!!
ОтветитьУдалитьСпасибо большое! Очень приятно!
УдалитьBeautiful card and an amazing tutorial! Thanks for playing with us at the Dusty Attic! xo
ОтветитьУдалитьThank you ,thank you!
Удалить